Real-Time Pixel Sorting in the Browser
Parallel sorting in WebGPU and overcoming powers of two
May 21, 2025
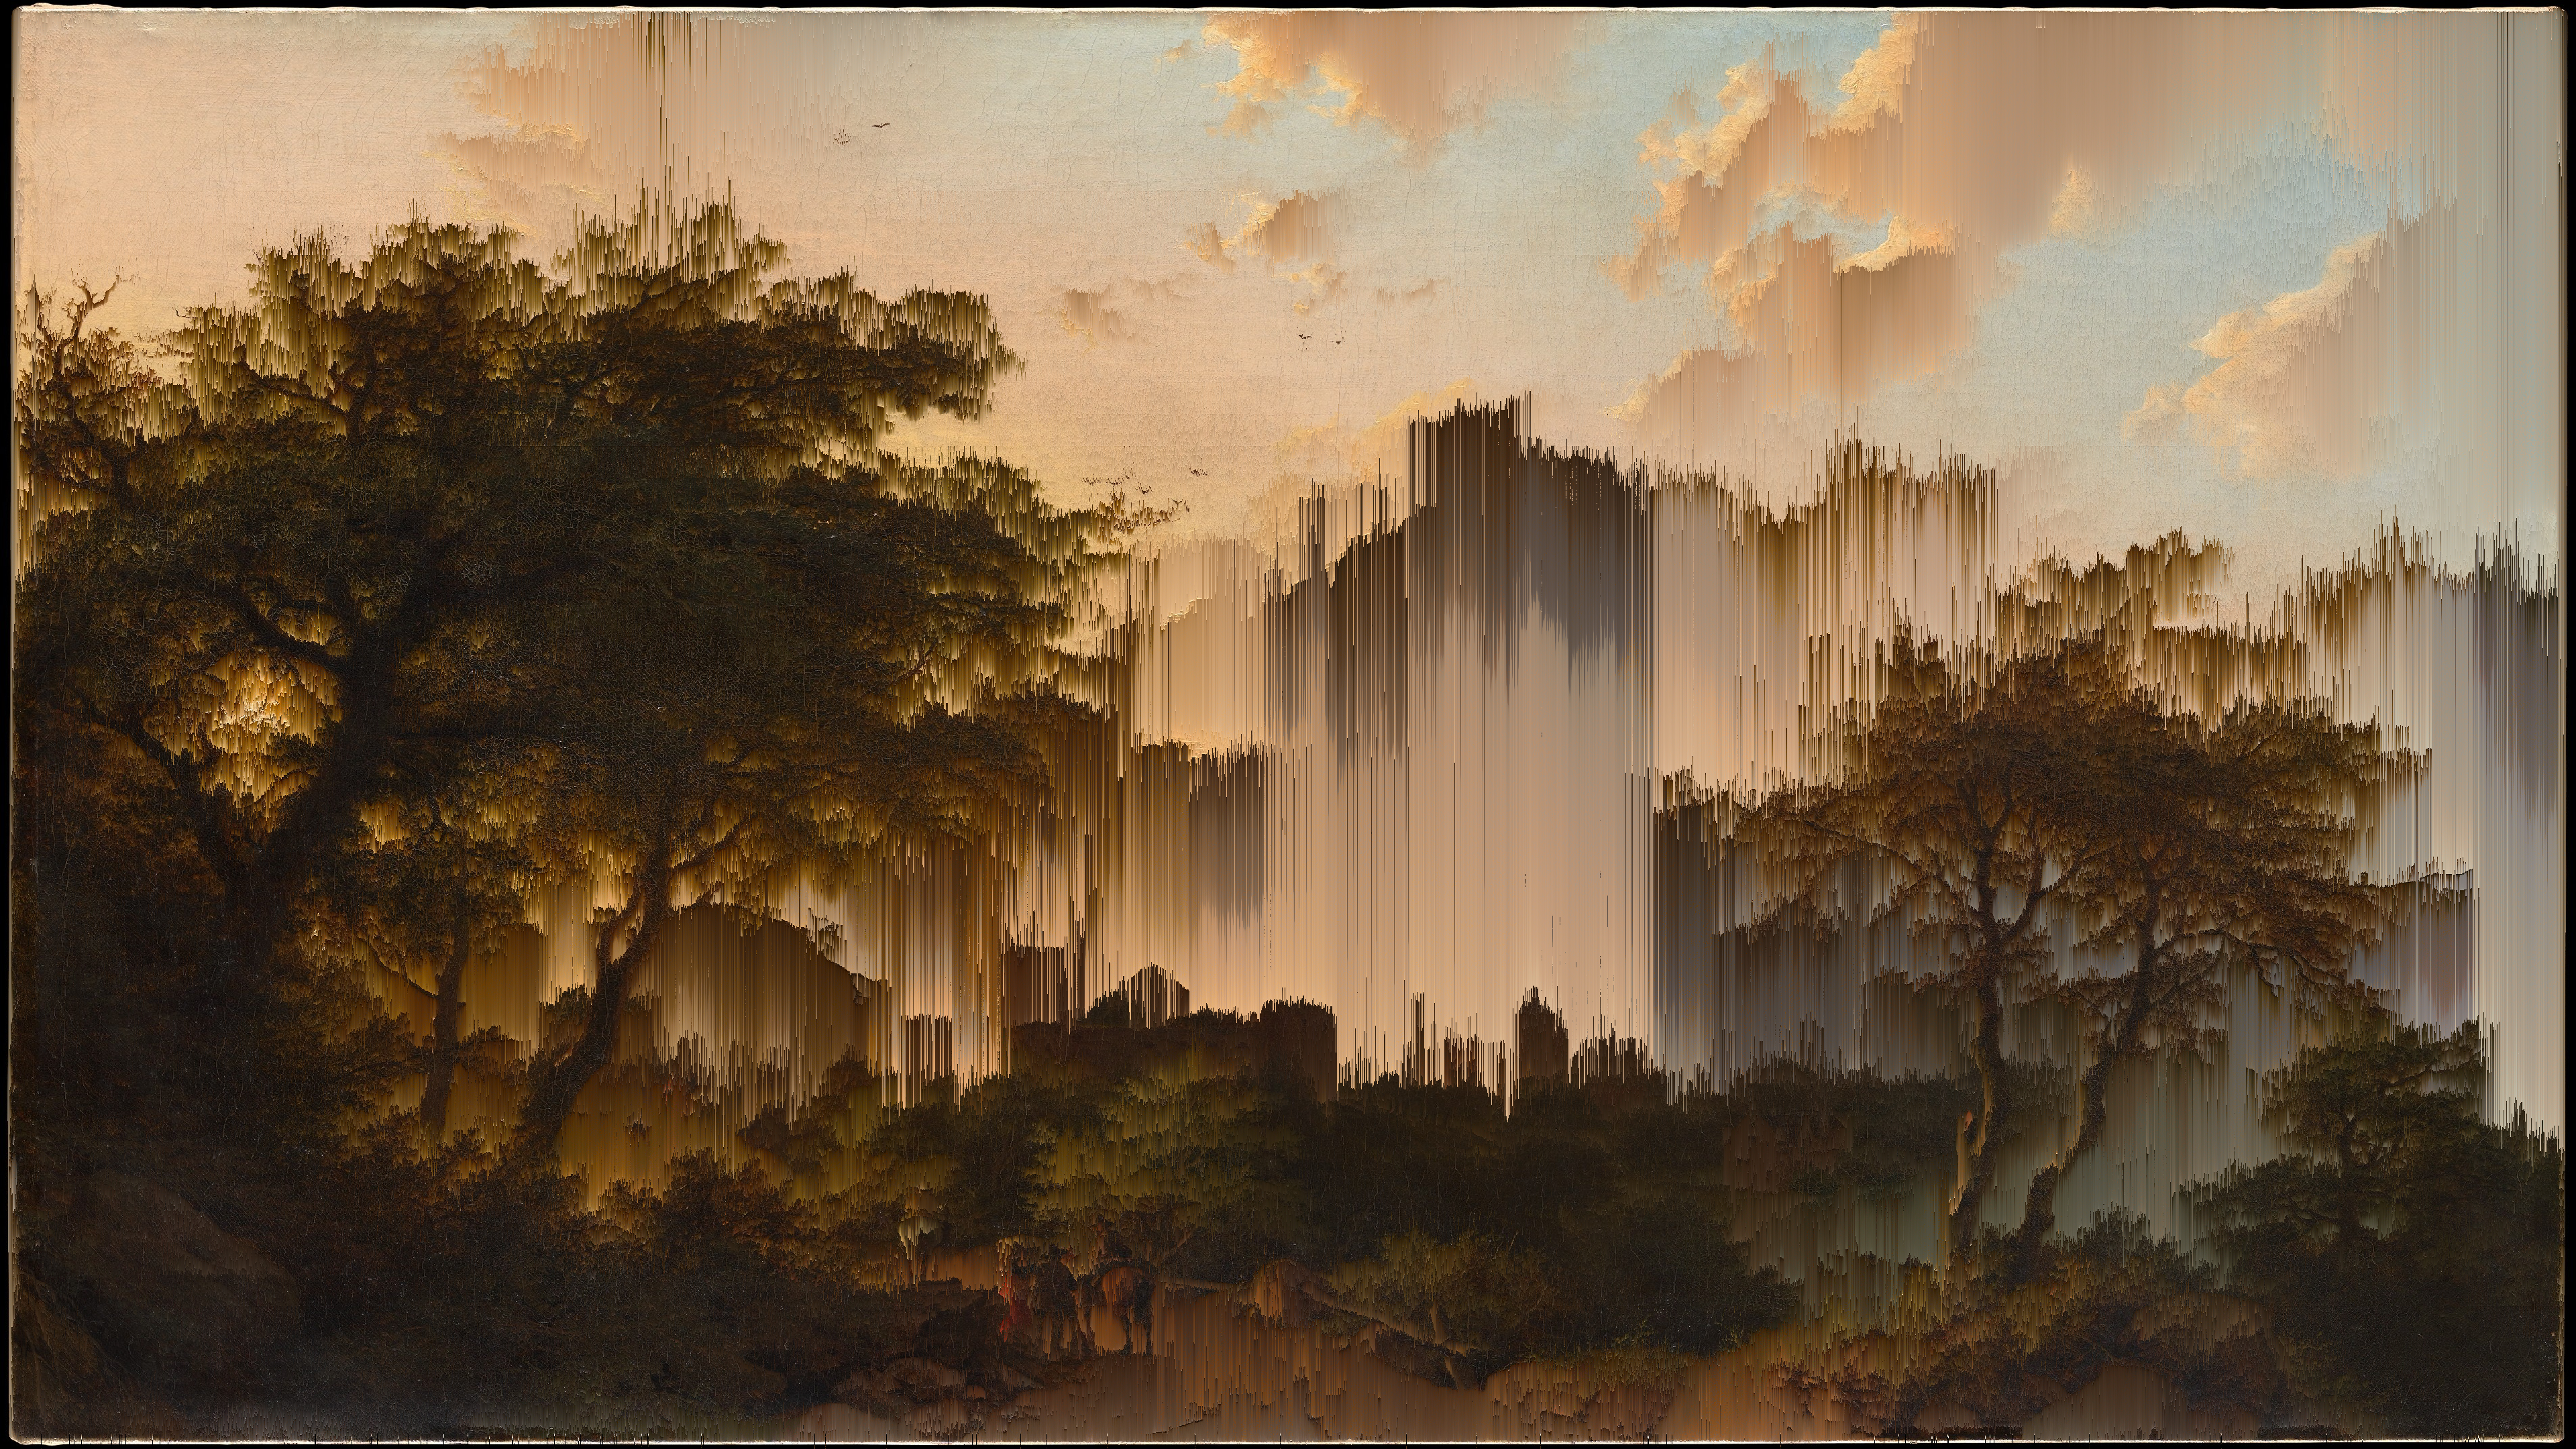
If you aren't familiar with "pixel sorters" or "pixel sorting" I'm sure you've seen the effect before. You can find this digital art effect in TV intros such as Slow Horses and in games such as Cyberpunk 2077. The post-processing effect makes an image appear as if it has been corrupted in some way with long streaks of sorted pixels mixed in with the original image. If you're on a browser with WebGPU enabled you can visit the experience here or if not you can see what it looks like below.
I hadn't originally planned on making this, but needed an "off-ramp" of sorts from my original plans of building a bounding volume hierarchy on the GPU which I quickly realized was too many new concepts to tackle all at once. I started falling down a rabbit hole trying to wrap my brain around how to implement a sorting algorithm on the GPU and decided that would be enough to focus on for the time being. After watching a video by Acerola on creating a real-time pixel sorter in Unity I figured that would be the perfect "medium" to get into parallel sorting algorithms.
While the effect has been around for years and various platforms and tools offer ways to achieve the effect, it's not often able to run in real time - that is: it's "slow" to compute and can't respond to user inputs (ex. games, live video, etc.). As Acerola goes over in their video this is not just an issue of implementing the sorting algorithm, but also an issue in the necessary "randomness" of the effect and how that clashes with the requirements of working with the GPU.

What I offer here is a real-time solution that can run in your web browser and can manipulate images, videos or webcam streams and allows you to change properties on the fly. Additionally, I present a preprocessing step to overcome some of the challenges pointed out in the video which requires us to use an alternative sorting method.
The majority of this work was done in late 2023 but I have made a few small adjustments or updates over the following year and a half. I had a lot of notes on the process and wanted to synthesize those into something more approachable. While some of the context of those original ramblings may be lost in time, I hope there's some value found in the overall approach and learnings I took away.

The basics
At its simplest, there's only really two requirements of a pixel sorter: 1) it should be able to sort pixels based on some sort property, and 2) and it shouldn't sort all the pixels. "Sort property" is purposefully vague since it can change, but this is something that can be determined or calculated for each pixel such as the luminance (aka. "the perceived brightness") or the amount of red from the RGB channels. "Shouldn't sort all the pixels" is also kind of vague, but the real charm of the effect is that you can still make out what the original image was.
If we compare an image that has been completely sorted against one with the effect applied "correctly" it's easy to tell which one gets used in TV and video games and which doesn't. This is achieved through a sort of mask applied to the image and/or a threshold on the property. Anyone familiar with image editing software will know a mask is effectively a second image layered on top of the first that is used to restrict an effect to a specific portion of the original image. In this case it determines which overlapping pixels would be sorted or not. A threshold is much simpler in which the property we sort (ex. luminance) is kept within some range of values: values outside don't get sorted, values inside do.
The "slow" history
As I mentioned at the outset, most uses of this will not run in real-time. This slower speed requirement allows for more flexibility in how the sorting is computed and resulting image rendered. We can go row by row (or by columns depending on the desired effect, but I'll only refer to rows for now on) and group pixels together to be sorted or skip others we want to keep in place. Replacing the partially sorted rows of pixels in the original image results in our desired effect.
This is pretty trivial to compute in any of your favourite programming languages on the CPU so long as you're able to manipulate an image. The first open sourced version of the effect in processing by Kim Asendorf does exactly that where each row of pixels in an image are operated on one by one and groups of pixels are grouped together in a conditional. The question then becomes: "If we have a solution already, why isn't that good enough and why are you wasting my time talking about an alternative?"
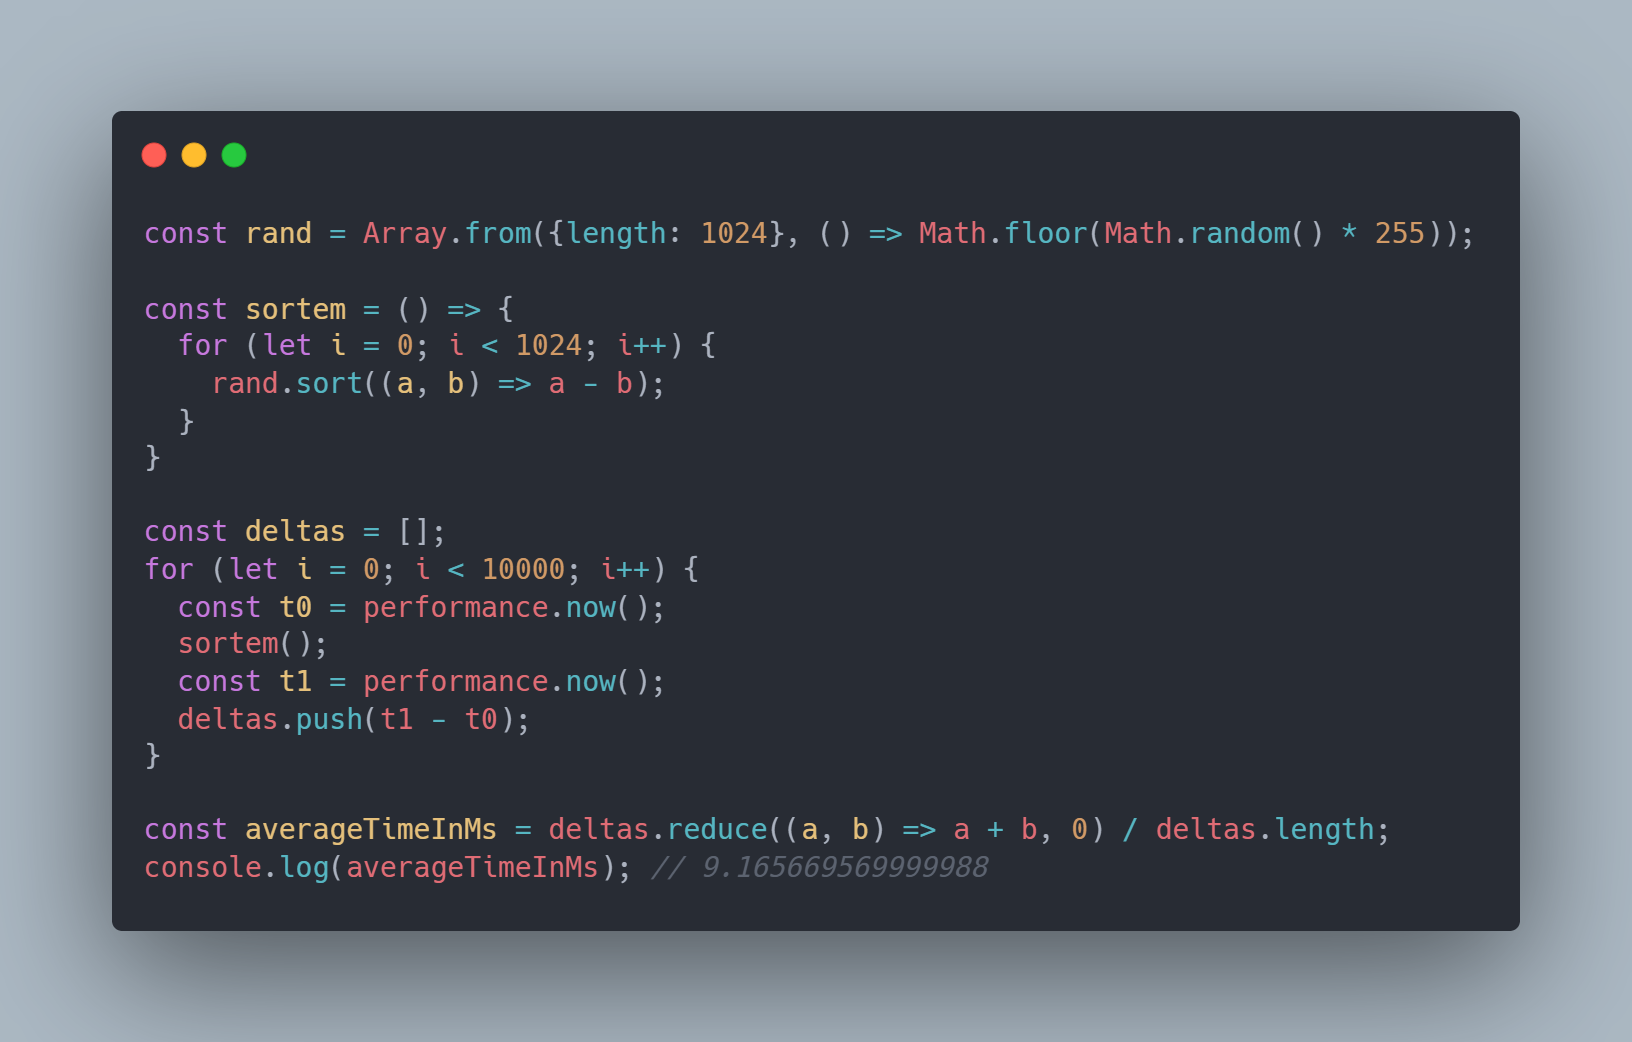
Simply put: it isn't fast enough. To run at 60fps (which has become a standard target framerate for real-time rendering and games) we have about 16.667ms per frame to work with. If we look at a somewhat reductive example where we sort 1024 "rows" of 1024 random numbers simulating our sort property we average about 9.16ms per "image." Over half the total time we would have per frame would be spent on sorting an image that's most likely smaller than the user's input. This also obviously excludes any time that would be spent on generating the values to sort or rendering the image and assumes everything gets sorted (which we know we don't want). I'll concede that this may be fast enough depending on your use case, but we want this to be a "post-processing" effect that's added on after all the other expensive stuff.
Another issue with keeping the sorting on the CPU is that if we do want to use the GPU to render (and for games we definitely do) then we'd want to pass data back (ex. the rendered scene before processing) from the GPU to the CPU each frame. This is a classic performance problem for GPU programming and is best avoided if you can. Since the CPU and GPU do not work synchronously with one another, getting data back means the GPU has to complete any work it is currently doing so the data can be mapped back to the CPU. While this is happening the CPU is waiting for the results and means it wasn't passing more data to the GPU to process and now the GPU is waiting for the CPU. There's some potential options with using multiple buffers so we can read results back and keep working on separate copies of the data, but in WebGPU getting mapped data back is done through GPUBuffer.mapAsync which returns a promise so we'd end up potentially with a bunch of unresolved promises or having to await in each frame. Neither of these are very encouraging, so let's look at how we can perform our sorting on the GPU and keep data transfer to a minimum.
Speeding things up
While originally made to accelerate graphics processing (hence its name) the GPU has become much more useful with the emergence of "general purpose GPU programming" or "GPGPU programming". Basically what this means is that instead of only operating within rendering pipelines to quickly calculate the position of a 3D model in space or calculate lighting we can use the same accelerated hardware to run programs to read and write arbitrary data. Early versions of this concept used textures within the normal graphics pipeline where the texel values could represent something other than a colour. A simple example could be a texture where the RGB values represent a vector in the XYZ directions. This concept is obviously still used all the time since that's basically what a normal map is, but the idea can extend to whatever you want so long as it can be represented in a texture.
The modern solution to GPGPU programming is what are called compute shaders which run separately from the render pipeline. They are similar to the vertex and fragment/pixel shaders found in all render pipelines in that they are small programmable functions that run on the GPU, however unlike the render pipeline shaders compute shaders are more "abstract." For example, a vertex shader is run for every vertex found in a vertex buffer - you don't control how much it runs. A compute shader on the other hand can run as many times as we choose as well as being run in various configurations depending on the amount of work we want to do.
Compute shaders
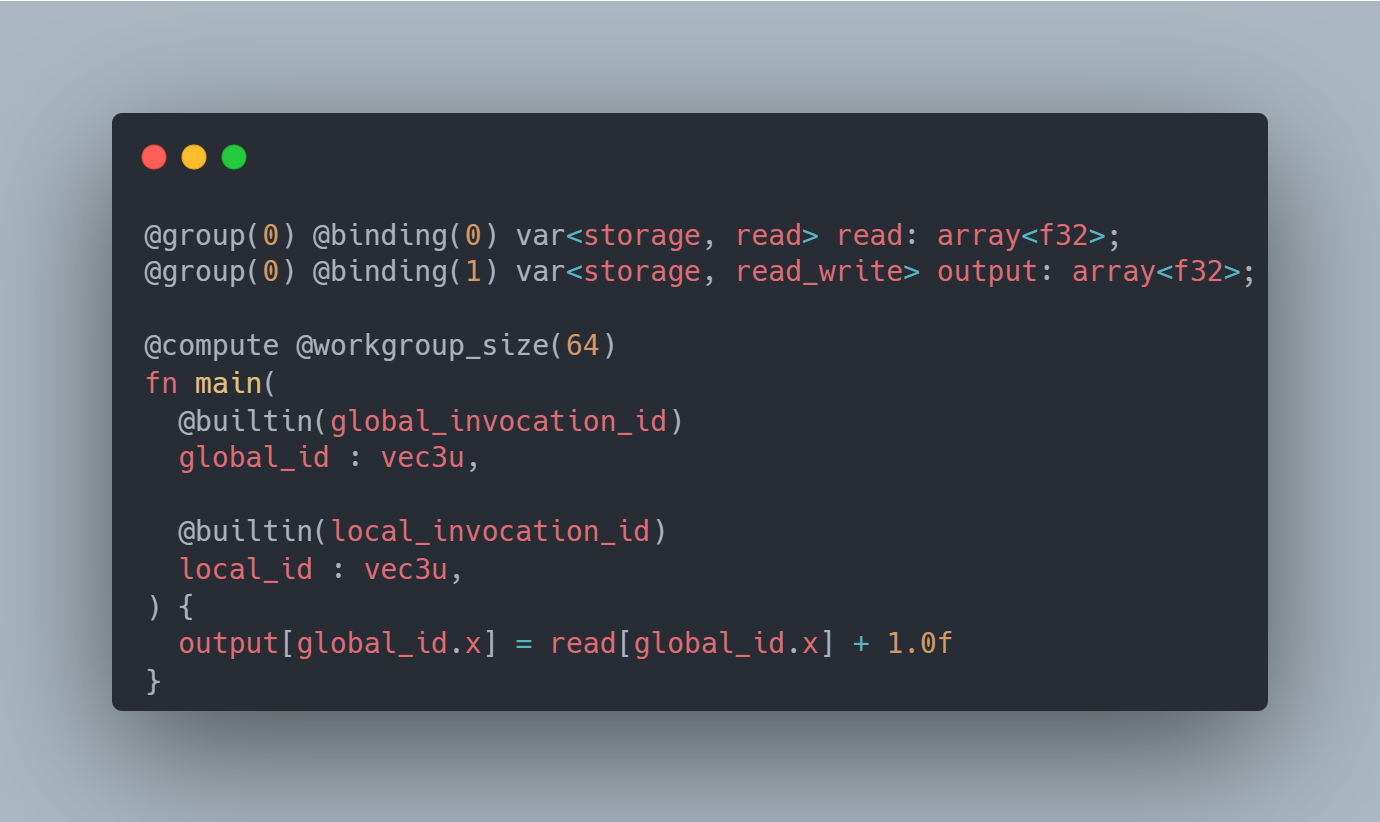
Compute shaders are configured through running a certain number of groups of threads together in what is called a workgroup. The workgroupSize is a 3D value which determines how many threads run together in a group. We can think of threads as simply an "invocation" of our shader program. Once we've defined a workgroupSize we dispatch a certain number of those groups - also configured with a 3D value. There's nothing actually requiring the use of 3 dimensions here, but it can potentially help in mapping shaders to a specific problem space. Each shader has default variables set which represent its id within its group, the id of the group within the total groups dispatched, as well as a global id. Since the data we have to read is just in a 1D buffer, we use these ids to determine where in the buffer we want to access and/or write to.
One constraint or requirement when working with compute shaders is that we can't really have a workgroup of size 1 and just dispatch a lot of groups. Partly because we're limited on the number of groups we can dispatch and partly because we want to make efficient use of each of our groups. A general rule for working with GPUs is trying to keep all the threads doing equal amounts of work and the overall number of threads kept well occupied. I'm kind of glossing over this and this is mostly a "trust me bro" moment, but there's two takeaways here.
First: to achieve a certain number of invocations of our shader we can balance the size of the workgroup and the number of groups we dispatch. (For example, dispatching 2 groups of 16 threads versus 1 group of 32 threads.) We may want to adjust the workgroup size to better align with the structure of our data, or sometimes in testing one combination ends up being faster than another. Second: we need to split up our problem into smaller, even, power of two chunks to efficiently make use of the GPU. This means we can't sort everything together, but instead smaller sections within a workgroup will be sorted and those individual groups will have to be merged together. More on that later.
Compute shaders are incredibly powerful and been used outside of the web for years, but its only been with the introduction of WebGPU that we have access to these. The older WebGL API has been used to render graphics on the web for some years, but is effectively "frozen in time" with features being locked to an older version of OpenGL. WebGPU is a newer browser API allowing us on the web to access more modern features found on graphics cards these days as well as an API style much closer to the likes of Vulkan. I'll be skipping WebGPU implementation details in this article, but there's some great introductory resources on WebGPU and compute shaders in this post at surma.dev and on webgpufundamentals.org.
The crux of the problem
We've talked a lot about background so let's revisit the problem now that we have a better sense of what steps we need to take. We know we want to take in some image data (ex. image, frame of video, frame of game, etc.) and generate a sort property that we can sort our pixels by. We then need to split up those values evenly into powers of two so they can be put through our WebGPU compute shaders and be sorted. When we sort the sort property values we want to make sure we move its associated pixel value around as well since that's what we'll output at the end. Once we've sorted these individual chunks we merge those chunks together into a new texture that can be output to the screen.
All of that is fine and dandy except for the part about "...need to split up those values evenly so they can be put through our WebGPU compute shaders..." One of our main requirements is that we don't sort all the values, and there's no way to guarantee a specific row of pixels in an image won't have a long series of pixels that need to be sorted. We can adjust the size of our workgroup to fit more values in to be sorted together, but the GPU limits that number as well so we can't fit a whole row or column in. We can't escape sorting all the values, so we need to find a way to somehow include all values into our sorting function, split up into small chunks, and end up with values that retain their initial position. This is where our preprocessing step comes in.
Preprocessing step
Ultimately the preprocessing step is a way to calculate the value to sort and as well as letting us fudge the numbers to "skip" certain pixels. This is another compute shader that will run a thread for each row of our input texture. We start by defining a couple variables to track for the whole row. This will be an incrementer that we'll add to all values we want to sort and replace all values we don't want to sort. We also keep track of whether we're currently in a group or not with inSpan.
We loop over each pixel in the row and unpack the texture data for that pixel. This provides us with the 4, 8 bit color channels (RBGA) that we'll then use to calculate our sort property. We then have to determine if we want to sort this pixel or not so we pass in our sort property to a function we'll call checkPixel that will return a boolean. This could check if the value is within the threshold or if the pixel location is overlapping a mask, but either way we want to determine if it should be included in the sort or not.
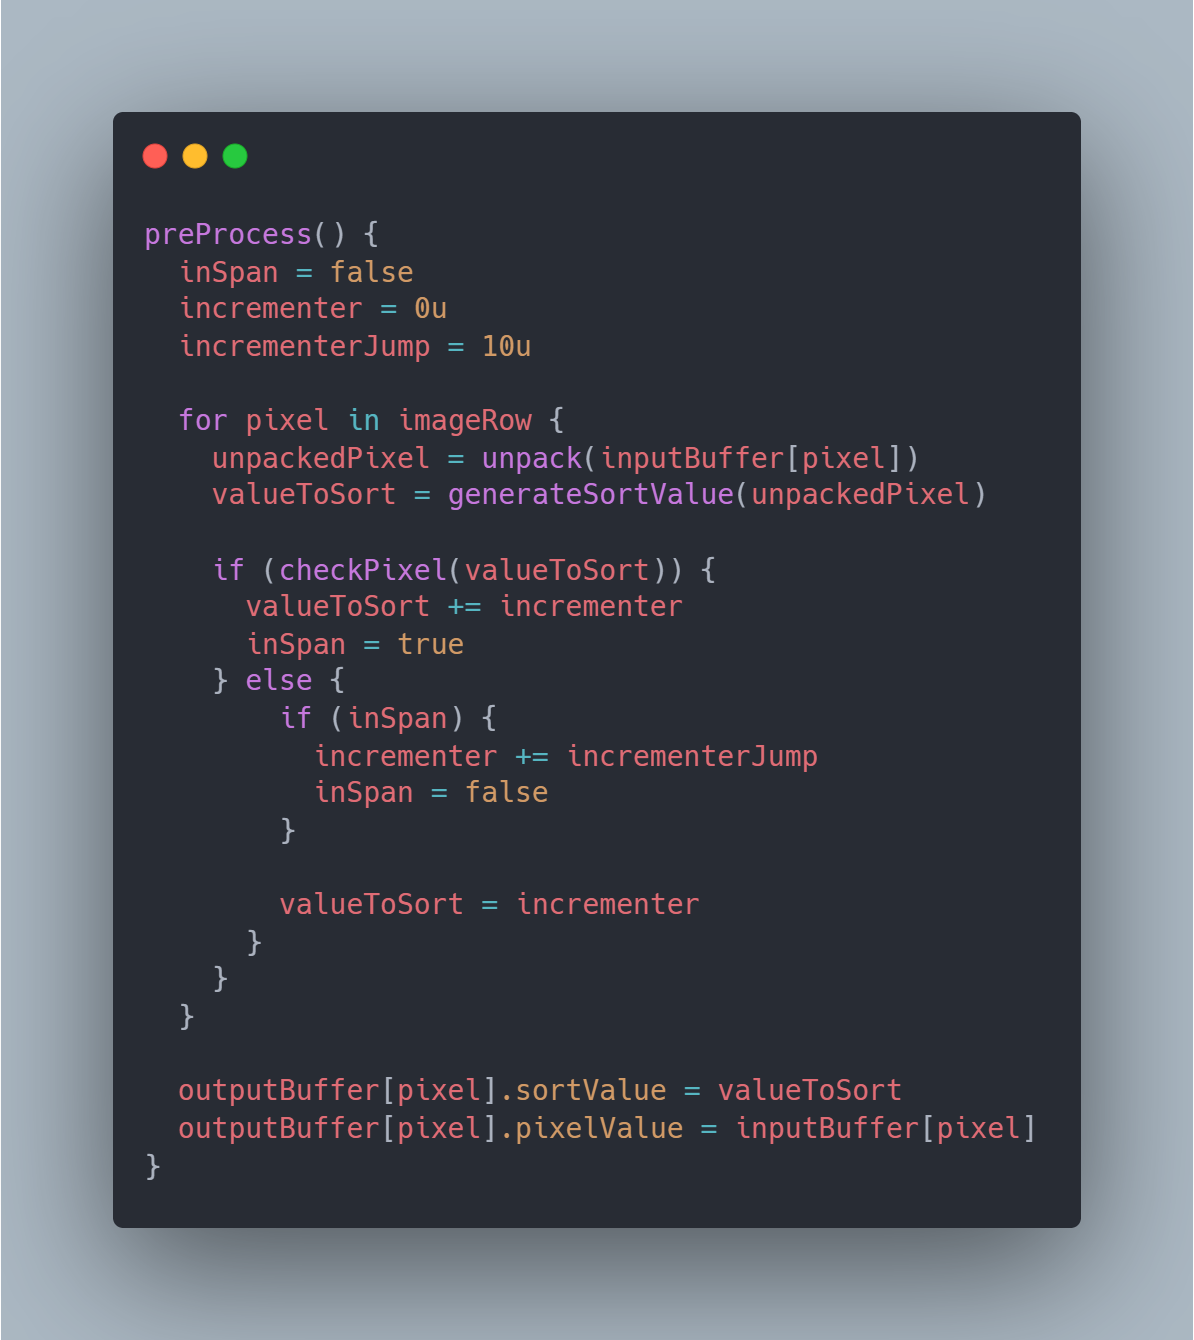
At this point there are then 3 conditions we'll find ourselves in. 1) Our value/pixel should be sorted so we add our incrementer to that current sort value and set inSpan to true. 2) Our value shouldn't be sorted and inSpan is true so we increase incrementer and set inSpan to false. 3) Our value shouldn't be sorted so we replace it with the incrementer. Condition 3 will happen regardless if condition 2 is true, the only difference is whether the incrementer gets updated first.
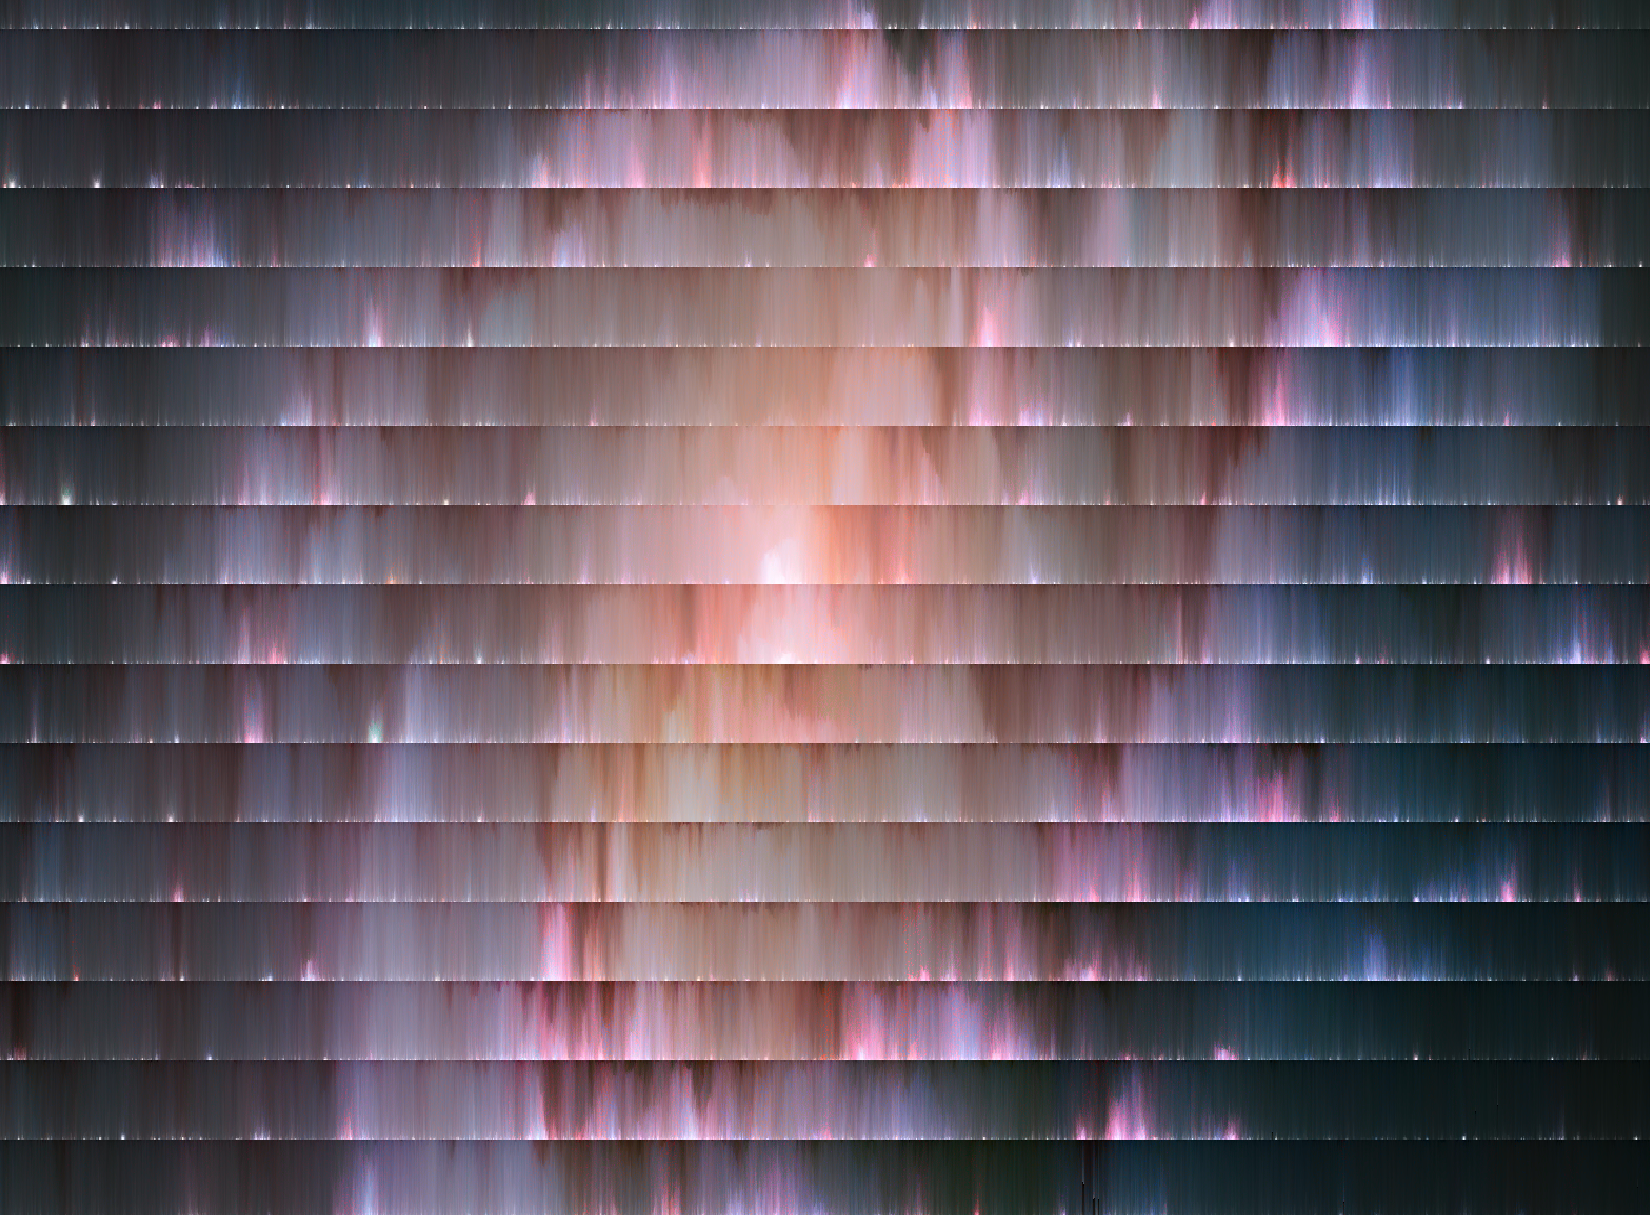
Each time we exit a section we want to sort we'll increase the incrementer by a value larger than any possible value found in the section before. For example, if each sort property is a value between 0 and 10, we'd increase by 10 each time. This means any value found further along in that row is guaranteed to be larger than any value before it. By replacing values outside the threshold with the current running total we make them all the same value for the sort so their location doesn't change at the end of the sort. If we were graphing all the sort values this step converts a random looking distribution into one that looks more like a staircase going up. A visualization of this can be seen below.
Sorting
The preprocessing step is run for each row and within a single thread there is no requirement for splitting things up into powers of two like the overall splitting of the sorting. We are perfectly fine to have arbitrarily long sections of sorted or not sorted pixels since when we split up the pixels to be sorted later the final positions are still guaranteed by our preprocessing step. This does however mean that we need a stable sorting algorithm (ie. the position of duplicate values does not change) so the popular bitonic sort is out and need to turn to something like parallel radix sort.
As you could probably guess, this is a parallelized radix sort where we're able to split up the work of the normal radix sort into independent threads. This is mostly based on the article in GPU Gems on an implementation of the parallel prefix sum which is used in the radix sort. A single step of the radix sort is technically 3 different compute shaders: 1) "split" the input value on the current bit we want to process, 2) perform the "up sweep" and then "down sweep" of the parallel prefix sum, 3) use the prefix sum to "scatter" the values into their new positions in the input.
For those unfamiliar with a radix sort, I've provided a quick visualization below. At each step of the algorithm we compare the bits set for each input value starting with the least significant digit (LSD). If the bit is a zero, we move the value towards the beginning of the input, if it is a one, we move it to the end. This is repeated for each bit moving our way up to larger values. It's worth noting that while this is eventually stable, values can move around quite a bit in earlier steps. One small potential performance gain I found is that by using unsigned integers as opposed to floats we can can stop the sort early if there's not going to be any more bits set after a certain point. Since so many more bits are used for the fractional portion of a float without consistent steps this is only really useful with integers. This is why my implementation has a bitsToSort setting in the controls. In testing, the sort is usually stable after 16 bits.
Merge our results
There is unfortunately still a final step missing. After splitting up our image into smaller chunks to sort we need to merge those chunks back together. Without this we have visible bands between each chunk if a section of pixels that needs to be sorted extends across two chunks. Our current implementation performs a binary search on the opposite chunk we're trying to merge a value with. For example, if we have chunk A and B, and A[i] = x, we search B for x. We use this "rank" alongside the initial value's position in its chunk to calculate the final output in the merged chunk. Similar to our other requirements, this can run in parallel for each pixel.
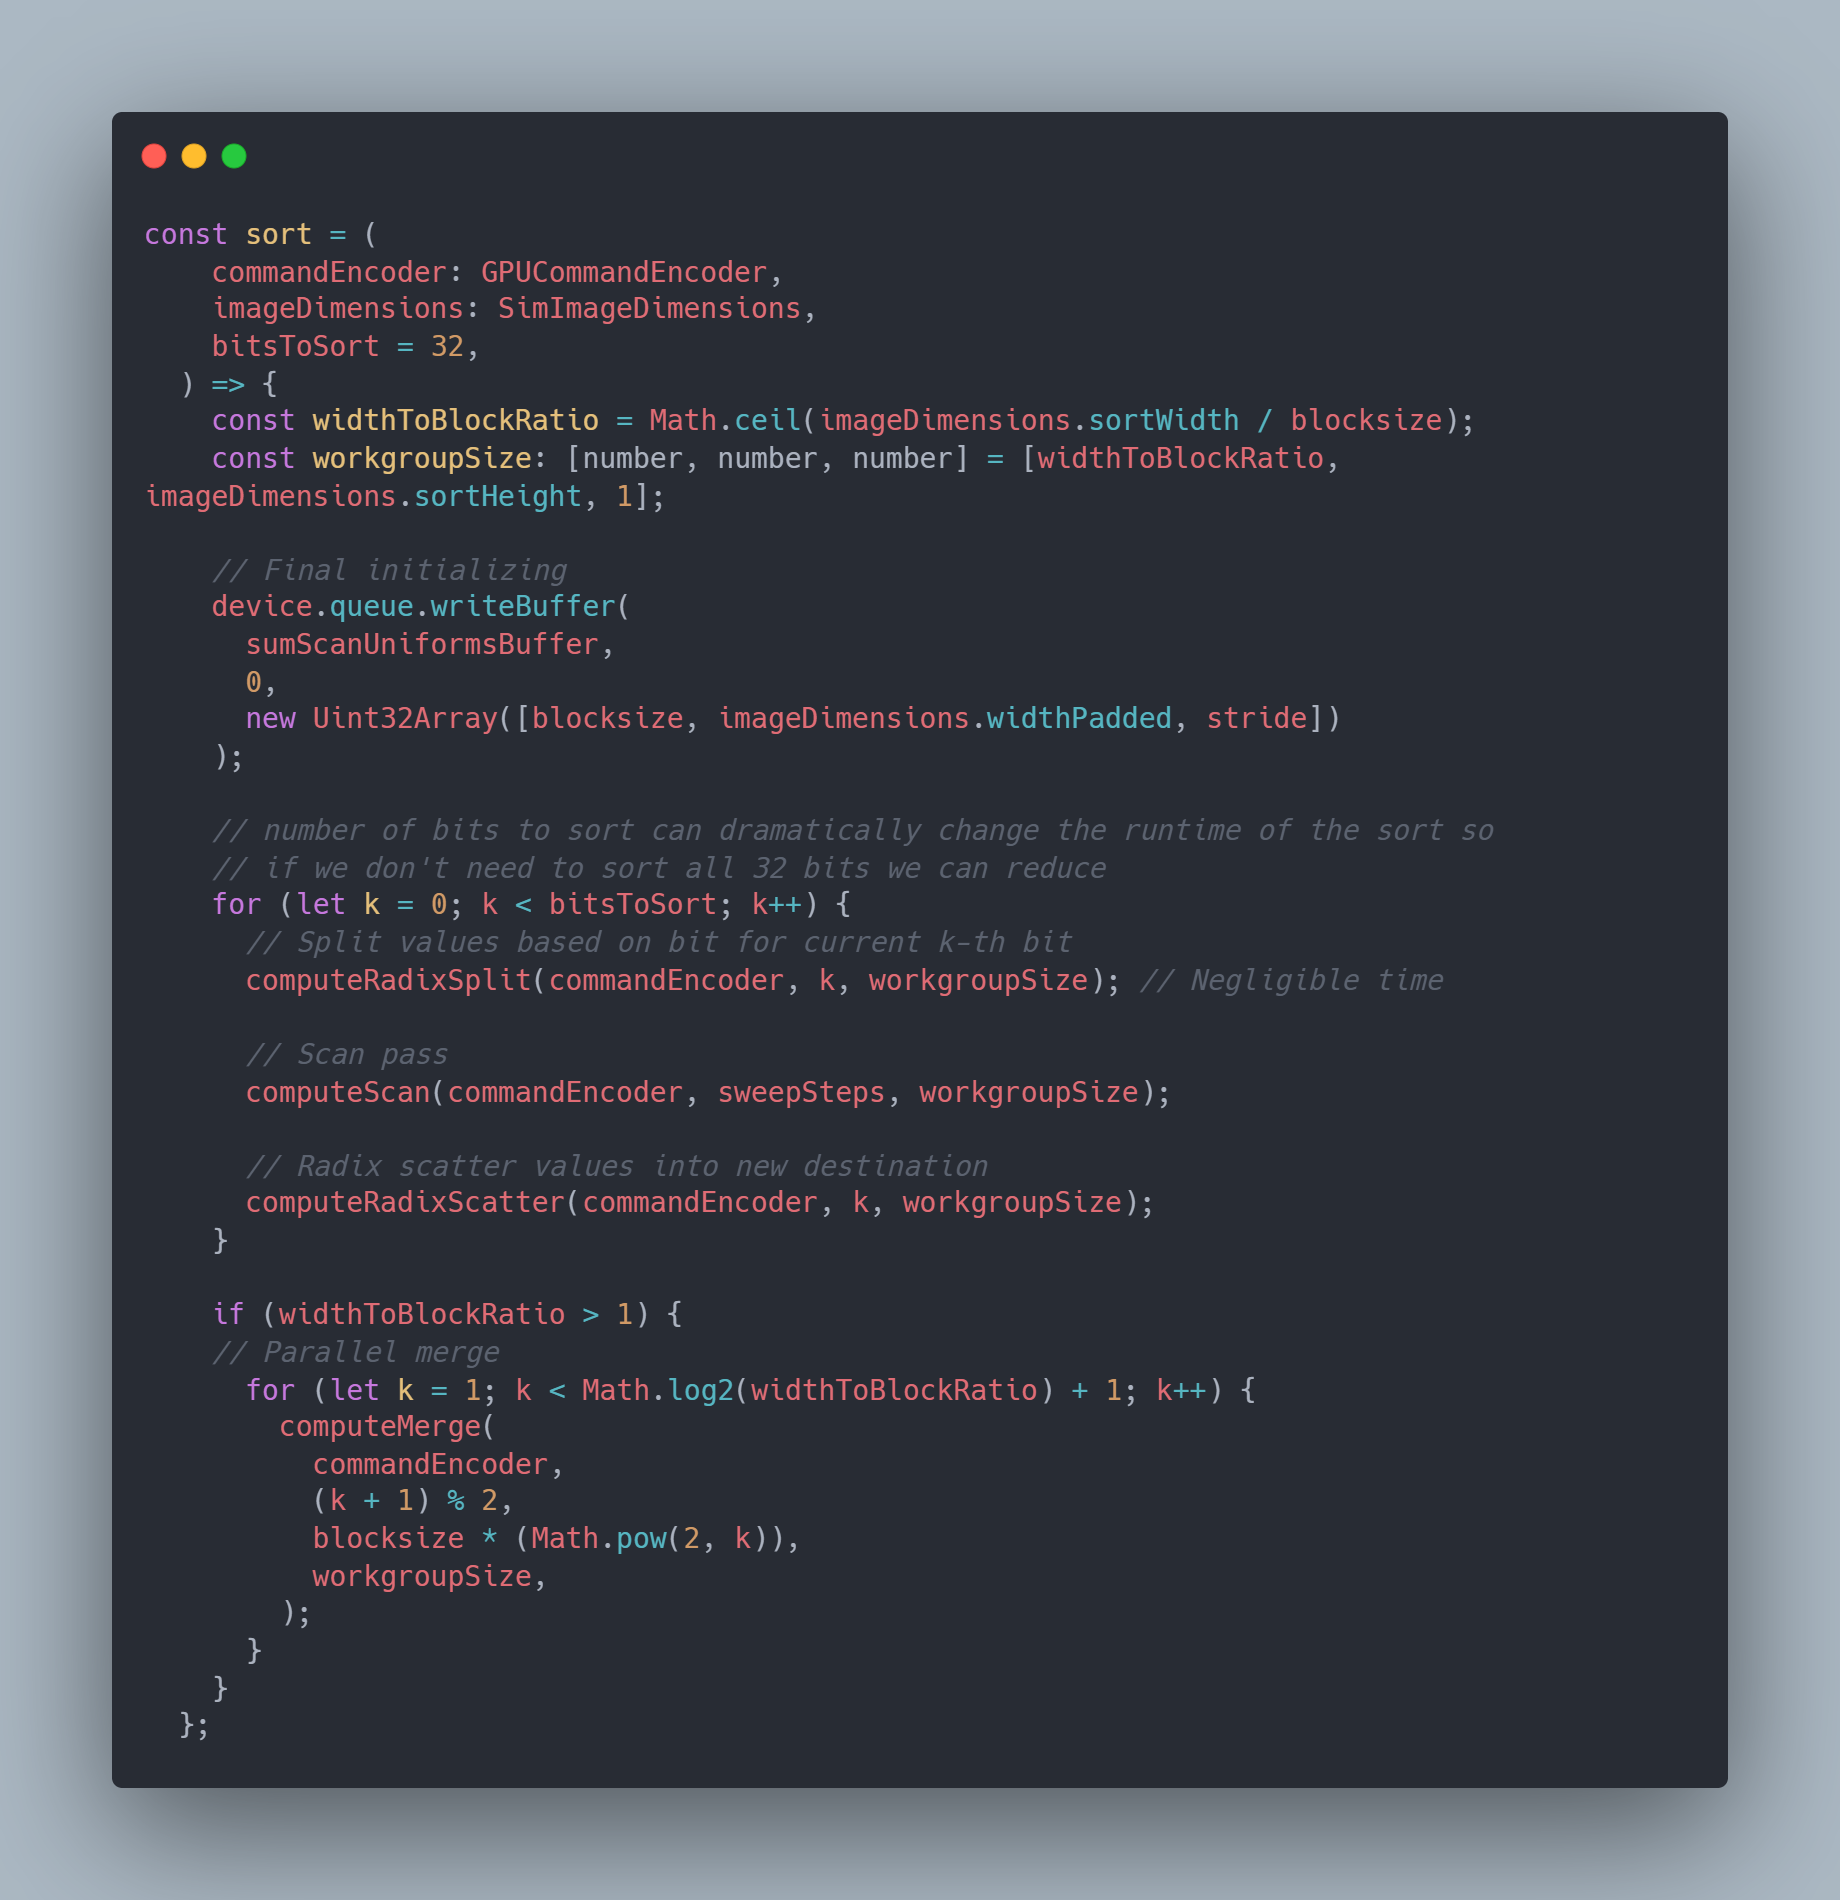
With our new knowledge on our preprocessing step and our sorting function selected we can revisit our steps with more specificity. 1) Run our preprocessing step for each row and generate a sort value we can store alongside the pixel value. 2) Split up each row into smaller chunks and run our parallel radix sort to sort that chunk 3) run a new shader to merge those chunks together 4) Save our new sorted texture and render to our screen.
Constraints and follow ups
While I'm pleased with the outcome it's worth noting that there are some limitations here. First, with the use of a steadily increasing value in our preprocessing step it is possible we'd run out of room if our input is large enough or if there's enough swaps between sections we sort and skip. We could maybe use multiple values that all need to be considered in sorting, but that complicates the subsequent steps and means our sorting operation would grow in time spent.
We also need to always deal with Po2 textures. We can fake that by creating a texture large enough for the input image by making any texels not in the input image the max int value so they're all sorted to one end. When outputting the sorted image we can then simply crop to the input dimensions. However, this does mean we still have to sort all those extra values which becomes slower and slower as texture size grows. Since every natural number can be represented as the sum of different powers of 2, it's possible there's maybe a clever way split up the texture into different Po2 sized sorts and combine them together? I'm just riffing at this point though and have no idea if that's possible.
If you've made it this far or simply skipped to the end I appreciate your time and hope you learned something! Perhaps I'll be back once I finally crack the BVH implementation that started this whole journey. Until then, stay curious!
Cheers,
Luke